In this guide, we will create a simple form using Next.js and validate it with the React Hook Form library. This library offers features for form field validation and allows us to manage fields, global states, services, error handling, schema validation, and more.
Before we start, ensure that you have Next.js installed. You can either use an existing project or set up a new one. For demonstration purposes, I will use a fresh Next.js project with Tailwind CSS.
Let’s begin!
Setup NextJS Project
Install Next.js: If you don’t already have a Next.js project, create one using the following command. If you have an existing project, you can skip this step:
npx create-next-app@latestInstall React Hook Form: After setting up the Next.js project, install the React Hook Form library using the command below:
npm install react-hook-formFor more information, please refer to the React Hook Form documentation.
Create the Form
After installation, we will create a simple form using HTML in the page.tsx file.
Here’s how your page.tsx file should look:
// my-app/src/app/page.tsx

"use client"
export default function Home() {
  return (
    <main className="flex min-h-screen flex-col items-center justify-between p-24">
      <div className="bg-white p-5 rounded-2xl w-5/12 shadow-xl">
        <h2 className="text-2xl">Form</h2>

        {/* Form Start */}
        <form>
        <div className="pt-4">
          {/* First Name & Last Name */}
          <div className="gap-3 grid grid-cols-2">
            <div className="mb-3">
              <label className="w-full">First Name:</label>
              <div className="w-full mt-2">
                <input type="text" placeholder="First Name" className="border w-full border-gray-300 rounded-md py-2 px-3 hover:border-gray-700" />
              </div>
            </div>
            <div className="mb-3">
              <label className="w-full">Last Name:</label>
              <div className="w-full mt-2">
                <input type="text" placeholder="Last Name" className="border w-full border-gray-300 rounded-md py-2 px-3 hover:border-gray-700" />
              </div>
            </div>
          </div>

          {/* Email */}
          <div className="mb-3">
            <label className="w-full">Email:</label>
            <div className="w-full mt-2">
              <input type="email" placeholder="Email" className="w-full border border-gray-300 rounded-md py-2 px-3 hover:border-gray-700" />
            </div>
          </div>

          {/* Password & Confirm Password */}
          <div className="gap-3 grid grid-cols-2">
            <div className="mb-3">
              <label className="w-full">Password:</label>
              <div className="w-full mt-2">
                <input type="password" placeholder="Password" className="border w-full border-gray-300 rounded-md py-2 px-3 hover:border-gray-700" />
              </div>
            </div>
            <div className="mb-3">
              <label className="w-full">Confirm Password:</label>
              <div className="w-full mt-2">
                <input type="password" placeholder="Confirm Password" className="border w-full border-gray-300 rounded-md py-2 px-3 hover:border-gray-700" />
              </div>
            </div>
          </div>

          {/* Submit Button */}
          <div className="mb-3">
              <button className="bg-blue-500 hover:bg-blue-700 text-white font-bold py-2 px-4 rounded" type="submit">Submit</button>
          </div>

        </div>
        </form>
      </div>
    </main>
  );
}
"use client" : This directive ensures that the code runs on the client side.
Styling
In this example, Tailwind CSS is used for styling. Ensure Tailwind CSS is properly set up in your project for the styles to be applied.
Importing and Setting Up React Hook Form
First, import the necessary functions from the React Hook Form library in your page.tsx file:
// my-app/src/app/page.tsx

import { SubmitHandler, useForm } from 'react-hook-form';
Next, create and register the form fields. Here is how to set up the form handler function:
// my-app/src/app/page.tsx

// Form Handler Function
const { register, handleSubmit, getValues, formState: { errors } } = useForm<UserFormInput>();- Import Statements: We import
SubmitHandleranduseFormfrom thereact-hook-formlibrary. - useForm Hook: The
useFormhook is used to manage the form state and handle validation. - Form Handler Function: The
registerfunction registers each form field,handleSubmitmanages form submission,getValuesretrieves form values, andformState: { errors }manages and displays validation errors.
Creating an Interface for useForm
First, create an interface to define the structure of your form inputs:
// my-app/src/app/page.tsx
// Form Input Interface
interface UserFormInput {
  first_name: string;
  last_name: string;
  email: string;
  password: string;
  confirm_password: string;
}
Creating the Form Submit Handler
Next, define a method to handle form submission:
// my-app/src/app/page.tsx
// Form Submit Handler Function
const onSubmit:SubmitHandler<UserFormInput> = (data:any) => setDisplayFormData(data)- UserFormInput Interface: This interface specifies the structure of the form data, including fields for
first_name,last_name,email,password, andconfirm_password. - onSubmit Function: This function handles form submission. It uses the
SubmitHandlertype fromreact-hook-formto ensure the data conforms to theUserFormInputinterface. Thedataparameter contains the form data, which is then passed tosetDisplayFormDatafor further processing.
To display the form data after submission, create a state variable using the useState hook:
// my-app/src/app/page.tsx
// Display Form Data Function
const [displayFormData, setDisplayFormData] = useState<UserFormInput>()
Implementation in Form
Now, let’s implement the form with the methods and states we have created.
- Add the onSubmit Method: Attach the
handleSubmitmethod and theonSubmitfunction to the form:
// my-app/src/app/page.tsx

<form onSubmit={handleSubmit(onSubmit)}>
2. Register Each Field: Use the register method to register each form field with validation rules.
{...register("first_name", { required: true })}For example, registering the first_name field:
// my-app/src/app/page.tsx
<input type="text" placeholder="First Name" {...register
("first_name", { required: true })} className="border w-full border-gray-300 rounded-md py-2 px-3 hover:border-gray-700" />
3. Validate Password Fields: Use the validate method for the confirm_password field to ensure it matches the password field.
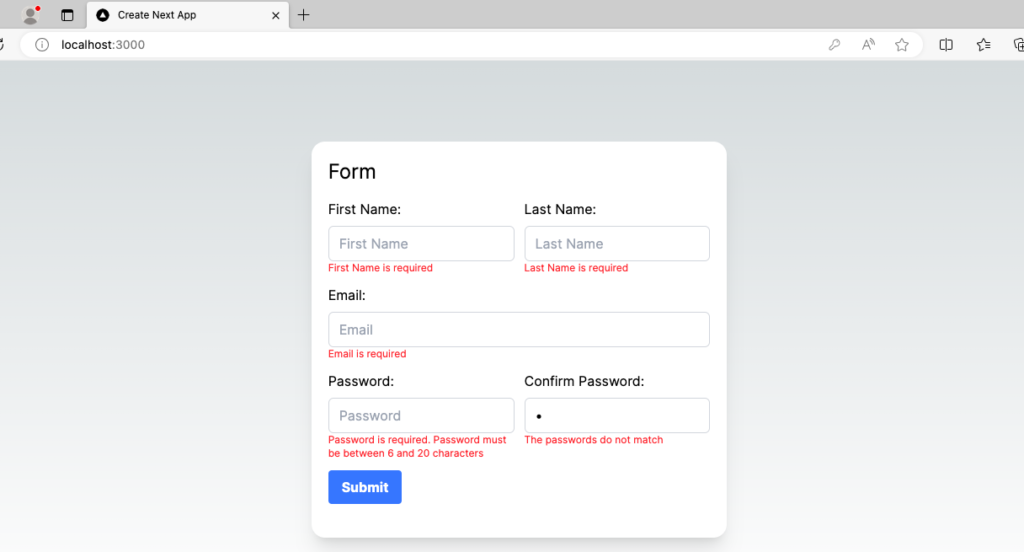
<input type="password" placeholder="Confirm Password" {...register("confirm_password", {required: true, validate:(value)=> {
  const { password } = getValues();
  return value === password || "The passwords do not match";
} })} className="border w-full border-gray-300 rounded-md py-2 px-3 hover:border-gray-700" />
Displaying Error Messages
After registering all fields, add error messages for each field to provide feedback to the user:
// my-app/src/app/page.tsx
{errors.first_name && <p className="text-red-500 text-xs">First Name is required</p>}
Displaying Form Data
After the form, you can display the submitted form data in JSON format using the displayFormData state:
// my-app/src/app/page.tsx
<div className='mt-5'>
    <pre>{JSON.stringify(displayFormData, null, 2)}</pre>
</div>
Once all the setup and coding is completed, we’ll proceed to check the web view. Here’s what you can expect it to look like:
For more validation method and pattern Please refer React Hook Form.
Refer to the React Hook Form documentation for more advanced usage and features.
Additional Information
For code reference, follow my GitHub repository: Next.js Form Validation with React Hook Form
Conclusion
In this guide, we demonstrated how to create and manage a form in a Next.js application using the React Hook Form library. Here are the key takeaways:
- Setup: We started by setting up a Next.js project and installing the React Hook Form library.
- Form Structure: We created a form with fields for first name, last name, email, password, and confirm password.
- Form Validation: We used the
useFormhook from React Hook Form to handle form state and validation. - Error Handling: Error messages were added to provide feedback for invalid inputs.
- State Management: The
useStatehook was used to manage and display the submitted form data. - Form Submission: We implemented a form submission handler to process and display the form data.
By following these steps, you can create robust forms with validation and error handling in your Next.js applications using React Hook Form. This approach enhances user experience by providing immediate feedback and ensuring data integrity.
