In the fast-paced world of Node.js development, efficiency and consistency are paramount. Setting up Node.js environments across different machines can be a daunting task, often plagued by configuration issues and dependency conflicts. However, with Docker, developers can simplify the process and ensure a seamless development experience. In this guide, we’ll explore how to set up a Node.js environment using Docker, enabling you to streamline your development workflow and focus on building great applications.
Before we delve into setting up Node.js with Docker, let’s ensure you have Docker installed on your system.
Setting Up Docker Environment:
To install Docker on your MacOS, Linux or Windows system, please visit the official Docker website and follow the provided instructions.
Let’s get started with a demonstration:
I’ve prepared a simple demo project using Node.js, featuring the EJS view engine.
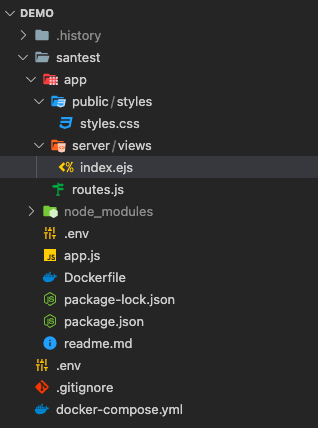
Here’s a breakdown of the project structure:
- I created a folder named “Demo”.
- Inside “Demo”, there’s a folder named “santest”, which contains all the files and folders necessary for the demo project, including “app.js” and an “app” folder.
- Additionally, I’ve included a .env file within this structure, where basic environment parameters such as port names and Node environment settings are defined. Feel free to modify these parameters to suit your needs.
Below is a screenshot illustrating the basic file structure of my demo project.
Here’s a breakdown of what i’ve done with the docker-compose.yml file:
version: "3"
services:
  santest:
    build:
      context: /Users/username/PROJECTS/DEMO/Demo/santest
      dockerfile: Dockerfile
      args:
        - PORT=${API_GATEWAY_PORT}
    restart: always
    hostname: santest
    env_file:
      - .env
    ports:
      - ${PORT}:${PORT}
      - ${INSPECTOR_PORT}:${INSPECTOR_PORT}
    volumes:
      - /Users/username/PROJECTS/DEMO/Demo/santest:/var/www/santest
- /var/www/santest/node_modules- Version Declaration: You’re using version 3 of the Docker Compose file syntax.
- Service Definition: You define a service named “santest” which represents your demo project.
- Build Configuration:
context: Specifies the build context directory containing the Dockerfile and any files needed for the build process.dockerfile: Specifies the name of the Dockerfile to use for building the image.args: Passes arguments to the Docker build process, here setting thePORTvariable using the value ofAPI_GATEWAY_PORT.
- Restart Policy:
restart: alwaysensures that the container restarts automatically if it stops for any reason. - Hostname: Sets the hostname of the container to “santest”.
- Environment Variables: Loads environment variables from the
.envfile into the container. - Port Mapping: Maps the ports specified by
${PORT}and${INSPECTOR_PORT}on the host machine to the same ports inside the container. - Volume Mapping: Maps directories on the host machine to directories inside the container, allowing for persistent storage. Specifically, it maps the project directory and the
node_modulesdirectory to corresponding directories within the container.
This configuration sets up your Docker environment to run your demo project with the specified settings and dependencies.
Project Structure and Dockerfile:
In my project folder named “santest”, i have an .env file containing basic environment parameters:
NODE_ENV=local
BASE_URI=http://localhost
PORT=3000
INSPECTOR_PORT=9233
API_GATEWAY_PORT=3000
Docker Setup:
I’ve prepared a Dockerfile to run and set up my application inside a Docker container.
Here’s the code:
FROM node:14.8.0-alpine

# Create project directory in the container
RUN mkdir -p /var/www/santest/

# Copy package.json and package-lock.json to project directory
COPY package*.json ./var/www/santest/

# Set working directory
WORKDIR /var/www/santest

# Install global npm packages
RUN npm install -g npm@6.14.7 nodemon

# Install project dependencies
RUN npm install

# Set PATH environment variable
ENV PATH /var/www/santest/node_modules/.bin:$PATH

# Copy all files from current directory to project directory in container
COPY . .

# Expose the port specified in the .env file
EXPOSE ${PORT}

# Command to start the application
CMD ["npm", "start"]
This Dockerfile:
- Uses the
node:14.8.0-alpineimage as the base image. - Creates a project directory
/var/www/santest/in the container. - Copies
package.jsonandpackage-lock.jsonfiles to the project directory. - Sets the working directory to
/var/www/santest. - Installs global npm packages like
npm@6.14.7andnodemon. - Installs project dependencies.
- Sets the
PATHenvironment variable to include the project’snode_modules/.bindirectory. - Copies all files from the current directory to the project directory in the container.
- Exposes the port specified in the
.envfile. - Specifies the command to start the application (
npm start).
This setup ensures that your Node.js application is properly configured and runnable within a Docker container.
Building and Running the Docker Container:
Once you’ve completed the previous steps, you’re ready to build the Docker image and run the container for your demo project.
Here’s how you can do it:
Navigate to your project folder using the terminal. In your case, the project folder path is:
Users/username/PROJECTS/DEMO/Demo/Run the following command to build the Docker image and start the container:
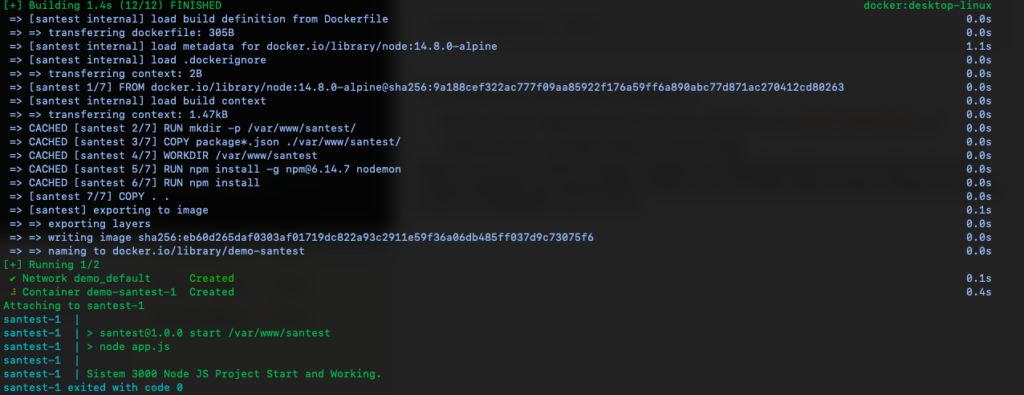
docker-compose up --buildThis command will instruct Docker Compose to:
- Build the Docker image using the instructions specified in the
docker-compose.ymlfile. - Create and start a container based on the built image.
Make sure you have Docker Compose installed and configured properly on your system. Once the process completes, your demo project should be up and running inside a Docker container, accessible as per the configurations you’ve set up.
Please refer to the screenshot below, captured after executing Docker Compose in my environment.
After successfully building the container, I can view it in the Docker Desktop application. The project’s container name is visible in the Docker Desktop interface, as shown in the screenshot below:

Accessing the Application:
When I open the application URL ‘localhost:3000’, the displayed page looks like the screenshot below:

You’re welcome to explore my GitHub repository, where you’ll find the source code for this demo project, offering a valuable reference point for your own projects. Github Link
Conclusion
In this blog post, we’ve explored the process of deploying a Node.js project using Docker, a popular containerization platform. Here’s a summary of the key points covered:
- Setting Up Docker Environment:
- Installed Docker Desktop on MacOS or Windows.
- Created a
docker-compose.ymlfile defining the project’s Docker configuration, including service definitions, environment variables, port mappings, and volume mappings.
- Project Structure and Dockerfile:
- Examined the project folder structure, including the presence of an
.envfile containing basic environment parameters. - Created a Dockerfile specifying the steps to build the Docker image for the Node.js project, including setting up the project directory, installing dependencies, and defining the command to start the application.
- Examined the project folder structure, including the presence of an
- Building and Running the Docker Container:
- Used the
docker-compose up --buildcommand to build the Docker image and start the container based on the defined configuration. - Verified the successful creation and running of the container using Docker Desktop application.
- Used the
- Accessing the Application:
- Accessed the running application via the specified URL (e.g.,
localhost:3000), confirming that the application is successfully deployed and accessible.
- Accessed the running application via the specified URL (e.g.,
By leveraging Docker, we’ve streamlined the process of deploying our Node.js project, ensuring consistency across different environments and simplifying the deployment workflow. Docker’s containerization approach offers portability, scalability, and ease of management, making it an invaluable tool for modern application development and deployment.
